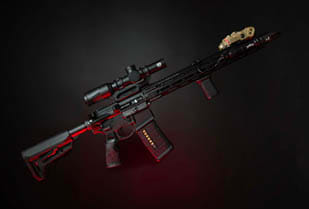
Jason introduces episode two of the personal build series and presents his rifle: an 11.5-inch SIG MCX Spear LT in 5.56, the third generation of the MCX platform. He notes that he upgraded from the previous Virtus generation to this lighter LT version. The MCX design mimics an AR-18 style system with dual guide rods and a captured, piston-driven operating system. The 11.5-inch barrel length is chosen to balance velocity and compactness, making the rifle suitable as a CQB gun, truck gun, or general-purpose run-and-gun setup without excessive barrel length. The focus of the build is weight savings, control, and reliability while keeping the platform compact and easy to handle.
At the muzzle, the rifle uses a SureFire three-prong muzzle device. Jason selects the three-prong primarily for flash signature reduction, which matters because he typically runs the gun suppressed. The suppressor is a SureFire RC2, which he describes as a proven option for reducing both visual and audible signature. He notes that this particular RC2 has over 27,000 rounds on it and continues to function without needing service, aside from a recent cleaning. The heavy carbon buildup on the muzzle device reflects the high round count. This front-end configuration is intended to keep the rifle controllable and discreet in low light while maintaining durability over extensive use.
For illumination, Jason runs a SureFire M300 Pro with a VAMP head. He acknowledges that the VAMP head reduces lumen output compared to standard heads but explains that its beam design concentrates light to appear brighter and, more importantly, provides both white light and IR capability with a lockout option. The lockout is important to him because accidental white light discharges under night vision can be problematic during classes or night work. His laser aiming module is a Wilcox RAID-XE, a high-end PEQ-style unit he uses extensively with night vision. The RAID-XE offers multiple modes, including IR flood, IR laser, and strobe, giving him flexible options for target identification and engagement in complete darkness, though he notes that such a unit is not strictly necessary for users who do not run night vision.
To manage both light and laser, Jason uses a Unity AXON switch with two buttons: one dedicated to the laser and one to the light. The light button is shielded to reduce the chance of accidental activation in either white or IR mode. He can momentarily flash IR, leave it constant-on with a double tap, or quickly toggle as needed. On the handguard, he adds Slate Black Industries rail covers to improve grip and protect his hand from heat during extended firing. A RailScales vertical grip wrapped in Goon Tape provides additional texture and positive control, especially on this SBR-length setup. For retention, he runs an Edgar Sherman Design (ESD) sling, chosen for its minimalist design, easy adjustability, and light weight. The sling is stowed with a small bungee and can be quickly deployed and “swum into.” He prefers non-padded slings to avoid neck irritation during frequent transitions.
The sling attaches at the front via a Griffin Armament FIX QD mount on the rail. Jason likes this mount because two set screws lock it in place, preventing movement and adding rigidity. Positioning the QD point near the middle of the receiver, combined with a rear attachment at the butt, gives him a two-point sling that handles with a one-point feel. This configuration suits his longer arms and allows better maneuverability compared to running the sling from the extreme front to the extreme rear of the rifle. The setup keeps the rifle close to the body like a holster for a long gun while still allowing rapid presentation and transitions. Overall, the front-end controls, grip surfaces, and sling layout are chosen to maintain positive control and consistent handling under different shooting conditions.
For his primary optic, Jason uses a SIG Sauer Romeo 4XT Pro red dot. His inspiration for the build came from the MCX used in certain military units, and he wanted a similar configuration tailored to his needs. The 4XT Pro is described as similar in form factor to an Aimpoint T2 but powered by a common AAA battery instead of coin cells, offering up to 100,000 hours of battery life and easier battery sourcing. The optic provides multiple reticle options, including a 2 MOA dot, a 32 MOA ring with dot, and variants with ballistic holdovers, allowing him to choose the pattern that best fits the scenario. The Romeo 4XT Pro also includes numerous brightness levels and dedicated night vision settings, accessible via a night vision “hot button,” which aligns with his frequent use of NVGs.
The Romeo 4XT Pro is mounted on a Unity Skyscraper mount at approximately 2.26 inches height over bore. Jason chooses this tall mount to keep his head upright, which is more comfortable and effective when shooting under night vision. The elevated height allows a more natural posture and easier alignment behind the optic while wearing a helmet and NODs. The mount includes integrated backup iron sights visible through the body of the mount. If the red dot fails, he can remove the magnifier and use these irons as a reference for aiming without needing separate flip-up sights. This setup keeps the top rail less cluttered while still providing a redundant aiming solution.
Behind the red dot, Jason runs Unity’s 4x magnifier in an FTC (Flip-To-Center) mount. This is Unity’s first in-house magnifier design and is integrated with their well-known FTC mechanism. Unlike traditional magnifiers such as the EOTech G33 or SIG Juliet series that flip to the side and can protrude into gear or belt lines when slung, the FTC design flips the magnifier down into the centerline of the rifle. This reduces snag potential and keeps the rifle profile cleaner. When he needs magnification, he flips it up into line with the optic; when finished, he pushes it down and returns to an unobstructed red dot view. The magnifier and mount are a single, easily removable unit without bulky thumb latches that interfere with the charging handle. Removing it also fully exposes the integrated iron sights in the Unity Skyscraper mount, preserving a simple, backup aiming option.