The video opens by introducing Jim, a retired Navy SEAL with 27 years of service, including 20 years at SEAL Team Six. He now works with Ferro Concepts and runs Actionon Consulting, focusing on tactical and leadership instruction. The hosts task him with turning a barebones Radical Firearms RF-15 into a go-to AR-15 for self-defense and battlefield-style use. The RF-15 is presented as a budget-friendly, no-frills AR-15 starting point. Jim explains that his preferred general-purpose fighting rifle is a 16-inch gun, with a 14-inch being similarly acceptable, balancing maneuverability and ballistic performance. He frames the build around a realistic defensive and duty context rather than competition, emphasizing reliability, practical accuracy, and the ability to fight from close quarters out to several hundred yards. Early on, the video also mentions their CFCcontest.com giveaway platform, where viewers can follow instructions for a no-cost chance to win featured items that might end up permanently in their gun safes.
Jim quickly identifies a low power variable optic as the heart of his setup, recommending a 2.5–10x scope as the primary sight for a defensive or battlefield rifle. He wants magnification for positive identification and precision at distance, while still retaining usability at closer ranges. Rather than using a 45-degree offset red dot, he prefers stacking a micro red dot directly on top of the LPVO mount at the 12 o’clock position. This keeps the shooter’s head and weapon in a consistent vertical plane, simplifying transitions between magnified optic and red dot. He explains that with a top-mounted dot, the shooter simply raises the head slightly instead of rolling the rifle, which is faster and more repeatable under stress. Jim also addresses mechanical backup iron sights, stating that if rail space allows, he likes having them as an additional redundancy. However, he notes that with a robust LPVO and a dedicated red dot already on the gun, irons become a tertiary backup rather than a primary concern.
The build progresses with an EOTech Vudu 1–10x LPVO mounted in a MAC mount, giving a wide magnification range from true 1x up to 10x. On top of that mount, they install an Aimpoint ACRO red dot, following Jim’s preference for a 12 o’clock stacked configuration. He positions the ACRO toward the rear of the mount so that eye relief and head position remain consistent when transitioning between optics, allowing rapid close-quarters engagement by simply lifting the eyes. Due to limited rail space on this particular Radical RF-15, they find that only a front mechanical sight would fit, which Jim deems unnecessary given the dual-optic redundancy already in place. The rifle’s original slimmer B5 stock is swapped for a B5 Bravo stock. Jim likes that the Bravo maintains a similar profile but adds storage plugs in the stock, ideal for carrying spare AA batteries that can power night vision devices or other gear. This small change supports sustainment in extended operations without adding bulk.
Attention turns to scope positioning and shooter interface. Jim mounts the LPVO so that its rear is roughly 2.25 inches forward of the charging handle, matching his fully extended stock length and providing optimal eye relief. He stresses the importance of a consistent cheek weld for accuracy, especially when shooting prone or at distance. To help index his cheek in the same spot every time, he tapes a piece of soft ear protection onto the stock, creating a tactile reference point that can be felt even when wearing helmets, ear pro, or different gear. Drawing from SEAL Team experience, he notes that an AR-15 configured like this can be effective to 500–600 yards, and their team rifles were doped to 700 yards for reliable body shots while still being usable from 0–100 yards with both eyes open. The top-mounted ACRO red dot at 12 o’clock is highlighted as a key tool for rapid close-range shots, eliminating concerns about eye relief and allowing quick transitions from magnified to unmagnified aiming.
The discussion shifts to how the rifle is carried and controlled. Jim outfits the RF-15 with a Ferro Concepts Slingster, using a QD mount at the rear and a Blue Force Gear wire loop at the front. He deliberately places the front sling attachment farther back on the rail instead of at the very front. This keeps the sling from interfering with weapon-mounted lights, pressure pads, and magazine changes, while still providing good stability when the rifle is slung. For better control in close quarters, especially with a longer rifle, he adds a BCM vertical foregrip. Jim explains that a foregrip helps prevent the weapon from being pushed out of the support hand during dynamic entries or when moving through tight spaces. It also reduces the chance of an adversary grabbing the front of the rifle and redirecting the muzzle. The foregrip becomes both a control point and a retention aid, particularly valuable in room-clearing and other close-contact scenarios.
Jim elaborates on foregrip placement, recommending it be mounted closer to the muzzle but not at the very last slot on the rail. Gripping the vertical foregrip near the front improves leverage and weapon retention, allowing the shooter to drive the muzzle quickly while maintaining control. This position also supports effective muzzle strikes to the head or upper body in extreme close-quarters combat, using the rifle as an impact weapon without losing control of the barrel. He notes that shooters with different arm lengths may move the grip a slot or two to find their ideal balance of reach and control. The build then incorporates a weapon light and a laser, with a discussion of when to use visible versus IR lasers and IR-capable lights. Jim frames this around night vision availability and mission type, such as home defense or law enforcement. The flashlight is mounted on the side, and he uses a power strip and tape to secure cables and switches for both light and laser, acknowledging that the current top-mounted switch arrangement is a compromise from his ideal configuration.
The focus moves to fine-tuning light and laser controls. Jim prefers a straightforward setup where the weapon light has a positive on/off tailcap that can be activated directly with the thumb, supplemented by a pressure pad mounted along the rail or foregrip using double-sided Velcro. This allows momentary or constant activation of both light and laser without clutter. They discuss the Steiner DBAL laser mounted above the LPVO, noting that the current 1.5-inch optic mount height provides enough clearance. If interference ever became an issue, Jim would rather relocate the laser to the bottom of the handguard using an M-LOK Picatinny adapter than change the primary optic height. He strongly discourages mounting lasers on the side of the rail because it introduces several inches of lateral offset. That side offset complicates point-of-aim and point-of-impact relationships at both close and extended ranges, making holds less intuitive. By keeping the laser in line vertically with the bore, zeroing and practical use remain simpler and more consistent.
Jim reiterates his preference for simple, reliable light controls: a tailcap that can be hard-switched on or off, plus a pressure pad for more nuanced activation. He mounts the pressure pad where his support-hand thumb naturally rests along the rail or foregrip, securing it with double-sided Velcro to prevent shifting under recoil. The Steiner DBAL remains positioned above the LPVO, leveraging the 1.5-inch mount height to keep everything aligned without crowding the optic. Jim emphasizes that if space becomes tight, moving the laser to the bottom rail is preferable to side mounting, which would create problematic lateral offset. To prepare the rifle for suppressed use, they remove the original mil-spec flash hider and install a SureFire three-prong flash hider. This device serves as a mount for a SureFire suppressor and offers excellent flash reduction. Jim notes that the three-prong design does not require timing because it lacks directional ports, simplifying installation while maintaining performance for applications like hunting pigs or tactical use.
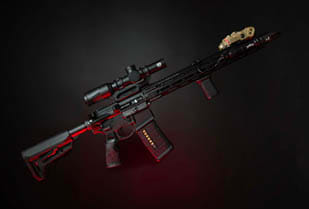
With the SureFire three-prong flash hider installed, they mount a SureFire SOCOM RC2 suppressor, completing Jim Foreman’s battle-ready AR-15 configuration. The hosts review how the once barebones, budget Radical Firearms RF-15 has been transformed with upgraded furniture, a Ferro Concepts Slingster, BCM foregrip, weapon light, Steiner DBAL laser, and an optic system combining an EOTech Vudu 1–10x LPVO and an Aimpoint ACRO at the 12 o’clock position. At the range, they test-fire the rifle at 50 yards. Jim comments that the gun shoots flat and soft, though it feels a bit gassy, which is common for a brand-new suppressed rifle. Initial impacts are slightly off, described as low or about two feet high and a little left, indicating the red dot is not fully dialed in yet. Despite that, the setup runs smoothly, and the RC2-equipped rifle is praised for being quiet and soft-shooting, with the top-mounted red dot shining for engagements at 50 yards and in.
In closing, the hosts emphasize Jim’s preference for the 12 o’clock Aimpoint ACRO over 45-degree offset mounts, citing faster, more natural transitions and consistent head position. They reflect on how the barebones Radical Firearms AR-15 has become a highly customized, visually striking rifle that Jason particularly favors, combining real-world SEAL Team experience with practical civilian and law enforcement considerations. Viewers are invited to share and submit their own rifle builds for the channel’s “Bust Your Builds” feature, where configurations are evaluated and discussed on camera. The video also promotes CFCcontest.com, described as a site showcasing appealing items from the channel. By following the posted instructions, users can enter at no cost for a chance to win gear that may end up permanently in their gun safes. The segment ends with appreciation for audience support, a blessing to viewers, and a promise to return with the next installment.












 Loading...